Remote Alerting (optional purchase)
You can set alerts for your desktop and, if purchased, remote alerts for your mobile device to let you know when certain weather events are approaching or affecting your locations. With the additional purchase of remote alerting, each of your locations can be set to alert separate email or text message addresses. Email addresses may be group addresses to reach more employees.
|
|
Remote Alerting (optional purchase) |
Alerts for your locations will continue to be generated even if you
are not signed in to MxVision WeatherSentry Online
All locations created will automatically use the alert criteria setting of your default location, therefore for the sake of efficiency, you may wish to set your default alert criteria prior to creating additional locations. Alert criteria and recipient assignments for individual locations can be edited at any time.
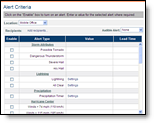
Select the criteria which when exceeded, will generate an alert in MxVision
WeatherSentry Online
Note: Storm Attributes and PrecipTimer
Within the Settings Menu, click the Alerts Menu option and the Alert Criteria submenu option.
Choose a Location and select
an Audible Alert.
Note: You must have sound capability on your PC to play alarm
sounds. If you have selected an audible alarm and the test sound is not
heard, you may need to install Active X. Typically a banner appears across
the top of your screen with instructions.
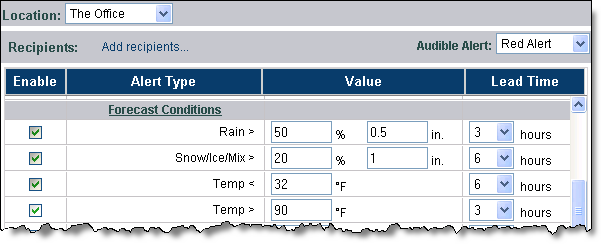
Enable the alert types that
you wish to receive. For some alert types you will need to enter one or
more values. Each location may have its own criteria with the exception
of Lightning and PrecipTimer
Select a lead time between one and 12 hours in the future.
If you have purchased the Remote Alerting option you may use the Add recipients... link to assign recipients to this Location.
Click Save Changes to save the alert settings.
Excessive alerts that add little additional value come from setting up alerts on too many locations, or setting up too many different types of alerts. Below are the alert rules that should be considered when setting your alert criteria.
A forecast alert is expired when
there are two consecutive hours in which that condition is no longer in
the forecast. The expiration allows for a new alert to be sent if the
condition is again met.
Example: A temporary break of two hours or less in a forecasted precipitation
event will NOT cause an alert to be sent a second time. However, after
two hours with no precipitation in the forecast the event will be treated
as a new event and will generate an alert on the first occurrence. Subsequent
occurrences will not generate an alert.
When the forecast condition persists, the alert is not re-issued.
Observed alerts are reset when there are at least two consecutive hours in which that condition is not observed.
When the observed condition persists, the alert is not re-issued.
Alert data will be reported in either English or Metric units as determined by your preference setting, excluding National Weather Service (NWS) based alerts. NWS advisories, watches and warnings will always use English units regardless of the preference setting.
Following are the alert types available:
|
NEXRAD radar based alerts are available to US locations including Alaska, Hawaii and Puerto Rico. Storm attribute alerts may be available to some Canadian locations located within 124nm of a US NEXRAD radar site. | |
|
Lightning alerting is available within your purchased region. Lightning data is an optional purchase. | |
|
PrecipTimer® alerts are available to locations covered by the US composite radar which includes the continental US and Puerto Rico. Some Canadian locations near the US/CA border may fall within the US composite radar footprint. | |
|
Available to all locations. | |
|
Available to all locations. | |
|
Available only to locations in the continental US, Alaska, Hawaii, and Puerto Rico. | |
|
Available to all locations. |
Note: Alerts will retain the unit preferences of when they were generated. If an alert is generated and received while using Metric preferences, that alert will remain in Metric units even if the preferences are later changed to English units.
Remote alerting is not necessary to view the alert status of your locations
on your PC. The View Alerts button within the MxVision WeatherSentry Online
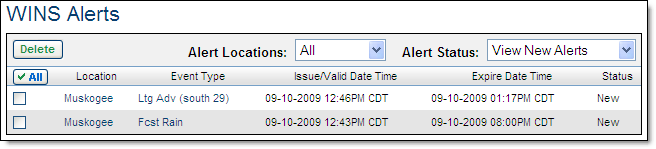
More details and options for each alert are available by clicking the link within the alert listing.

The alert detail provides additional information.
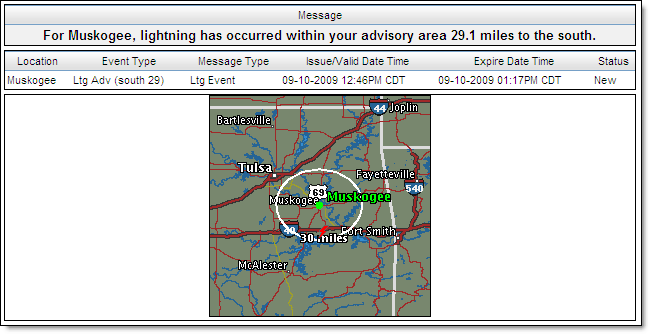
The detail is displayed along with three options:
|
|
Click Mark as Archived to archive an alert for future reference. An archived alert will remain available for up to two years. |
|
|
Click Delete to remove the alert from the list. |
|
|
After viewing an alert click Back to go back to the list of alerts. |
You can view a list of the archived alerts by selecting View Archived Alerts from the Alert Status menu. You can also choose to view only the new alerts or view all alerts.
Remote Alerting is an optional purchase. Contact your sales representative for details.
Your mobile device can receive alerts generated from the criteria which was set in the Alert Criteria page. You may use any device that can receive an email or text message, including cellular phones, alphanumeric pagers, and desktop email. Recipients can be assigned to each alert location.
Within accounts under administrator control the setup process is available only to the Account Administrator.
You may create as many recipients as you like.
Click the Manage Recipients submenu option under the Alerts Menu option.
Click the New button below the Recipient list.
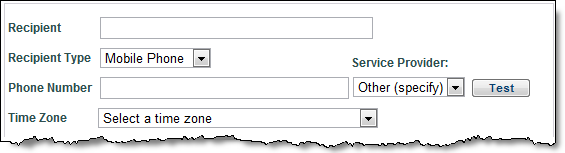
Enter an unique name for the device in the Recipient text field.
Select the Recipient Type;
mobile phone or email.
Sending text messages via SMS Gateway is optional.
Enter the mobile phone number
and select the provider.
OR
Enter the email address. Email addresses may be group addresses to
reach more employees.
Always test your mobile/email
address by clicking the Test button. You can do this at any time, even
before saving this recipient listing.
You should receive a test email from accountsetup@meteorlogix.com.
Select the time zone for the location from the Time Zone drop down menu. If daylight-saving time is observed at the location enable Observe Daylight Savings Time.
Select either the No Quiet Period or Specify Quiet Period radio button.
If Specify Quiet Period is
selected, set the starting and ending times for up to two quiet periods.
Then select the period (daily (Sun-Sat), weekday (Mon-Fri), weekend (Sat/Sun),
night and weekend, day of the week) from the Period drop down menu. In
this example non-severe alerts will only be received between 6AM and 5PM,
Monday - Friday.

Note: You can still receive severe weather alerts during
the quiet periods by enabling Severe Weather Warning Override. If you
enable this option you will still receive notice of any issued National
Weather Service warning or Severe Hail, Mesocyclone, and Tornado Vortex
Signature alerts.
Click the Save Changes button.
If necessary, click Delete to remove a highlighted recipient.
Select recipients from the
Add Recipients link in the Alert Criteria screen. When the criteria is
met an email or text message will be sent to all recipients assigned to
the location. The alert will also be viewable under the View Alerts button
within the MxVision WeatherSentry Online
![]() MxVision WeatherSentry Online
MxVision WeatherSentry Online


