Slide Shows are an optional service. Contact your sales representative for more details.
|
|
MxVision WeatherSentry Online
|
Multipanel Slide Show Requirements Chrome (with no extensions installed), Mozilla Firefox 3 or higher (with NO plugins), or Internet Explorer 8 or higher is required when using the multipanel slide show option. The multipanel slide show is not supported in Internet Explorer 7. We suggest using Chrome or upgrading your IE browser. Single Panel Slide Show Requirements Chrome (with no extensions installed), Mozilla Firefox 3 or higher (with NO plugins), or Internet Explorer 7 or higher is required when using the Slide Show option. Note that IE7 is nearing end of life. Optimal Viewing For best results turn off your screen saver when playing a slide show.
|
Monitors and forecasts can be added when using the Multipanel Slide Show. The Multipanel Slide Show is included in the platinum package. Contact your sales representative for more details.
Load the item to include in the slide show. This can
be any of the Monitored Locations monitors and the Daily / Hourly Forecast.
Note: All data will update in your slide show.
Click the Add Slide icon.
![]()
In the popup window, select a slide show. The slide
is automatically named.
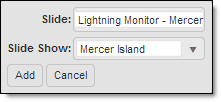
To create a new slide show, type a name in the Slide Show text field.
Click the Add button. Continue this process until you have added all of your preferred data.
A layered map can be temporarily repositioned in a slide show while being viewed. Simply drag it as you would in the Weather Viewer.
Select the Weather Menu option.
Configure your layered map with the desired area, zoom
level, layers and animation selection. If your layered map is set to animate
it will play three animation loops in the slide show.
Note: All data will update
in your slide show.
From the Tools menu select Add to Slide Show.
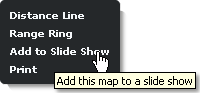
Note: Layer data will update and if plausible animate.
In the popup, type the slide title.
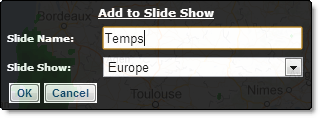
To create a new Slide Show, select <New> from
the drop down menu and type a name in the text field.

Click the OK button.
If a layered map is manipulated in a multipanel slide show the slide will automatically be paused. Click the pause / play button to continue advancing the slide show.
Multipanel Slide Show is included in the platinum package. Contact your sales representative for more details.
Note: The Multipanel Slide Show option is NOT supported in IE7
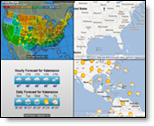
The multipanel viewer can display up to four different slide shows at once and offers three layout options. Slide shows are customizable, compatible with large screens or projections and they update automatically. Each of the four shows has its own toolbar.
Select the Slide Shows Menu option. Your most recent
view will automatically begin to load.
![]()
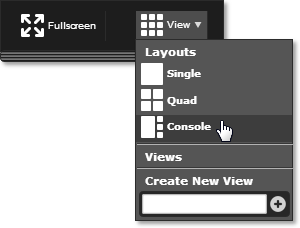
Select a layout from the View drop down menu.
Load a slide show in each of the available viewers.
Note that each viewer has its own toolbar which includes Settings and
Pause / Play options. (Settings is not yet implemented)
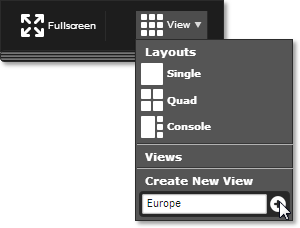
To save your view, type a title in the Create New View
text box and click the Add icon. The Fullscreen selection is NOT saved
as part of your View.
To modify a View, you must first select it from the
drop down.
Make any modifications to your View.
Save your modifications.
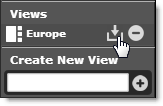
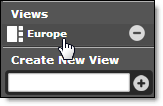
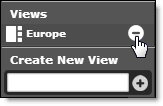
To delete a View click the Delete icon.
Load an existing view or create / modify a view using the instructions above.
To pause a slide show click the Pause / Play icon from
the toolbar.
![]()
Note: If pause is selected
while a graphic animation is playing, the animation will finish before
the pause is implemented. If an animated layered map is playing when pause
is selected that animation will continue to play until the pause is removed.
The slide show will then advance.
When using the Console View a slide show in the smaller
frame can be swapped with the main frame by clicking the Swap icon.
![]()
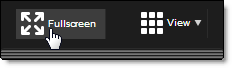
To play your view in full screen, select the Fullscreen
icon. Return to normal mode by clicking the icon again.
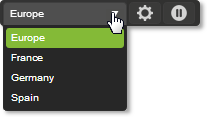
To choose a slide show other than the default, click on a title from the list of slide shows in the Slide Shows panel.
To pause your slide show click the Pause icon from the
toolbar.
![]()
Note: If an animation is playing when pause is selected, the
animation will finish before the pause is implemented. If an animated
layered map is playing when pause is selected that animation will continue
to play until the pause is removed. The slide show will then advance.
To view your slide show in full screen, click the Full
Screen icon.
![]()
In full screen mode your slide show opens in a second browser window.
You must turn off your popup blocker when using the full screen feature.
Setup for using Full Screen.
To close the full screen mode click anywhere on the screen.
To delete, organize or modify the speed of your show
select the Settings Menu.
![]()
Choose the Slide
Show Settings Menu option.
![]()
![]()