Lightning Manager
After you or your Account Administrator have created your locations,
any or all, locations may be monitored via the NWS Bulletins Monitor,
WindMonitor
If you are under administrator control your Account Administrator will determine your monitoring preferences.
|
|
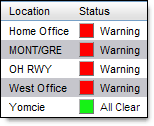
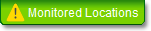
To view the status of your monitored locations, click the Monitored
Locations button.
The button will flash red when your monitoring criteria has been met for
any of your monitored locations.
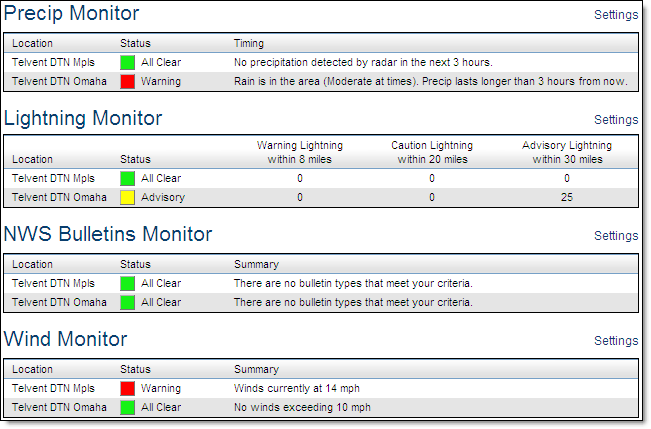
You can also view the graphical display of the monitors on the Dashboard.
Within the Settings Menu button
click the Location Monitoring Menu option and select the PrecipTimer
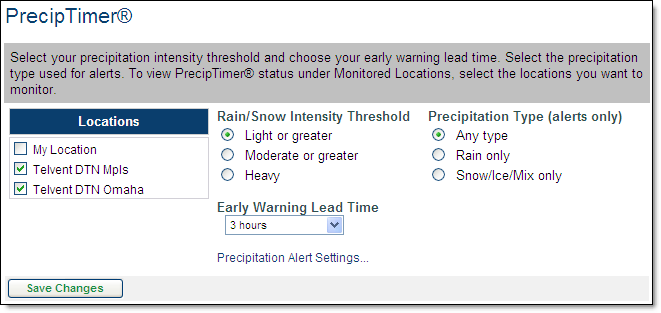
Select one or more locations
to monitor.
Each location with a check mark will be monitored and listed under
the Monitored Locations button. All will use the same settings.
Select the Rainfall Intensity
Threshold.
This threshold determines what criteria must be met before sending
a notification to the monitored locations page. Select the Light or greater
option to be notified of all approaching precipitation.
Select the Early Warning Lead
Time from the drop down menu. Choose from 30 minutes to three hours.
The lead time determines how many hours in advance you will begin to
receive notification of approaching precipitation.
Click Save Changes to store your settings.
The criteria set here will be used for PrecipTimer
The radar and future radar layers of the Local Radar display can also assist when monitoring precipitation.
Lightning
Manager
After creating your locations, those which are located in your purchased
lightning region may be set up for monitoring via Lightning Manager
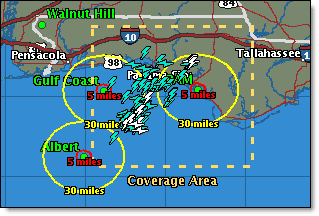
The purchased lightning region is depicted by the gold dashed box. Range rings are turned on or off within the display options of the lightning layer; found in the Local Radar page. If the advisory range of a location does not at least touch the purchased lightning region it will never display range rings as depicted by the Walnut Hill location in the example above.
To be counted, lightning strokes must be within the purchased region AND within the advisory or warning range of an active location. Therefore, in this example, the western edge of the Gulf Coast advisory ring (outside of the purchased region) will not be monitored and will not be included in stroke counts.
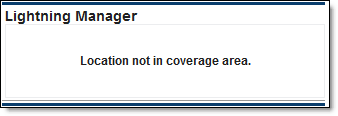
When the latitude and longitude of a location falls outside of the purchased lightning region, as depicted by the Albert and Walnut Hill locations, it is said to be inactive. No lightning strokes will be counted for an inactive location.
Locations outside of the lightning coverage area will also be shown
as inactive within Lightning Manager
Within the Settings Menu button
click the Location Monitoring Menu option and select the Lightning Manager
Select the Location(s)
to monitor. All of your locations are listed and can be selected, however
only those located within your lightning coverage area will be active.
Each location with a check mark will be listed under the Monitored
Locations button. All will use the same settings. Within the display options
of the lightning layer found on the Local Radar screen, you may choose
to show range rings around only your monitored locations.
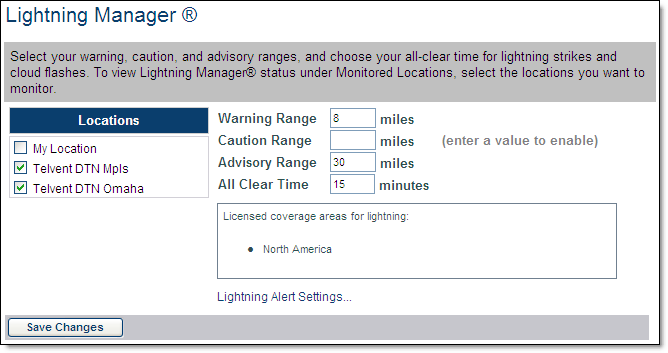
Set the range for the warning area between 5 and 60 miles (8/96 km). The warning range is typically set as a smaller radius than the advisory range. The default range is 8 miles (13 km). Do not set your range for a greater area than your lightning coverage area as only lightning data within your purchased coverage area will be displayed.
Set the range for the advisory and/or caution area between 5 and 60 miles (8/96 km). The default range is 30 miles (48 km). Do not set your range for a greater area than your lightning coverage area as only lightning data within your purchased coverage area will be displayed.
Set the All Clear Time, between
10 and 30 minutes.
All Clear Time is the number of minutes that you require your ranges
to be void of lightning strikes in order to consider the area safe to
resume business. When no lightning is detected in your advisory range
for the set amount of time, you should receive an advisory area all clear
alert. Likewise when no lightning is detected in your warning range for
the set amount of time you should receive a warning area all clear alert.
The default is 15 minutes. When using All Clear with Lightning Manager
Click Save Changes to store your settings.
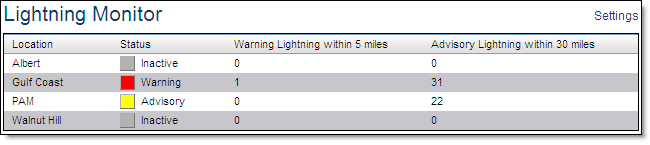
To view the monitored locations, click the Monitored Locations button. The button will flash red when your monitoring criteria has been met.
The criteria set here
will be used for Lightning Manager
To view an animation of the lightning strikes, load a lightning layer in the Local Radar page and select the Play icon.
DISCLAIMER: Experience has proven that the timeliness, resolution and manner in which lightning data is displayed does not solely support the effective or reliable use of the data in making decisions of an immediate or short term nature that involve the safety of personnel or material. Any such applications or similar uses by customers are done at the risk of the user and are neither condoned nor recommended by Telvent DTN, Vaisala or Vaisala's suppliers.
Within the Settings Menu button
click the Location Monitoring Menu option and select the NWS Bulletins
submenu option.
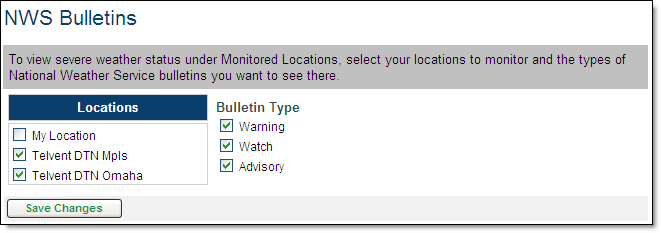
Select one or more locations
to monitor.
Each location with a check mark will be monitored. All locations will
use the same settings.
Select the Bulletin Type.
This selection determines which bulletins must be issued before sending
a notification to the monitored locations page. Select any, or all of
the bulletin types.
Click Save Changes to store
your settings.
The NWS Warnings, Watches and Advisories layers of the Local Radar
page can also assist when monitoring bulletins.
WindMonitor
Within the Settings Menu button
click the Location Monitoring Menu option and select the WindMonitor
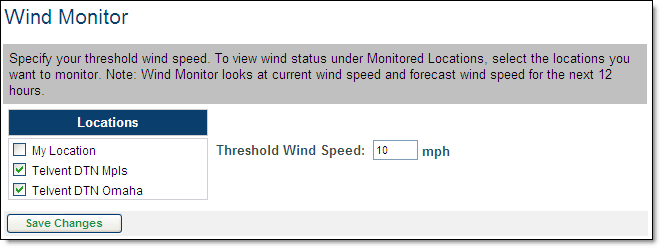
Select one or more locations
to monitor.
Each location with a check mark will be monitored. All locations will
use the same threshold.
Set the Threshold Wind Speed.
Click Save Changes to store
your settings.
The Surface Winds graphic and the wind speed/direction layer of the
Local Radar page can also assist in determining your wind scenario.
![]() MxVision WeatherSentry Online
MxVision WeatherSentry Online